First Aid Theory, Definition, Kit contents, DRABCD, CPR, AED (UK/Dubai)
Workplace First Aid Instructions
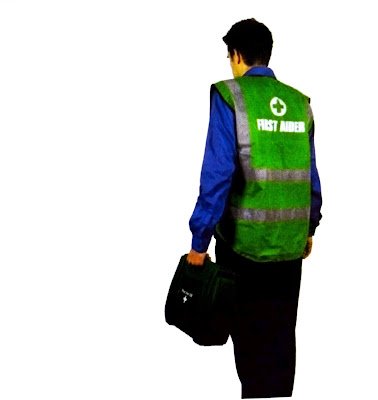
First aid in the workplace is defined as the temporary assistance required by an injured worker until professional medical care can be provided. First aid is not medical care, and it is critical to remember this as you go through any kind of first aid training or provide first aid in an emergency. Aside from training, a first responder should have the following personality qualities to effectively assist in an emergency: communication, empathy, fitness, initiative, positivity, selflessness, and vigilance. In the workplace, a Security Guard is the first responder to any emergency, including medical issues, and must be aware of DRABCD to handle the situation properly. The SIA training in the UK/ SIRA training in Dubai have included this content for securing the workplace and creating a better environment.
Many people are afraid of providing first aid to the injured because they fear legal repercussions if something goes wrong. If you provide first aid while staying within the scope of your training, you are not legally liable.
The information gathered during the company’s assessment of first aid needs will be used to determine the contents of a first aid container. A risk assessment of a construction site, for example, would determine a higher risk factor than that of a small office. As a result, the number of first aid materials would be increased.
Recommendation for installing a First Aid kit.
• Always maintain a neat and dust-free environment at all times.
• Make it accessible and reachable, preferably near hand-washing facilities.
• Maintain a sufficient supply.
• The color of the first aid kit should be green with a white cross.
• Examine regularly and restock after use.
• Throw away old items.
Items included in the First Aid Kit
• Wound Dressing (Finger, Medium, and Large)
• Triangular Bandage with a pin
• Resuscitation Face Shield
• Conforming Bandage
• Burn Dressing
• Foil Bandage
• Nitrile Gloves
• Content List
• Eye Wash
• Eye Pads
• Plasters
• Leaflets
• Scissors
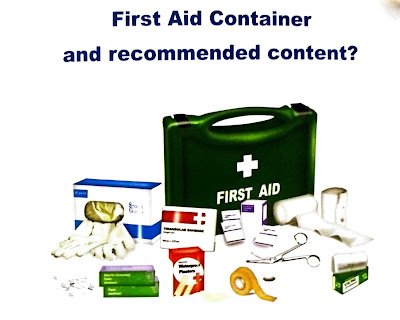
The first aid kit does not contain Panadol or any medicines. This is a common, tricky question in SIRA exams.
Some short forms that are used in First Aid.
AED: Automated External Defibrillator
BLS: Basic Life Support
CPR: Cardiopulmonary Resuscitation
DRABCD: Danger, Response, Airway, Breathing, Compressions, Defibrillator
LIONE: Location, Incident, Other Services, Number of casualties, Extent of injury
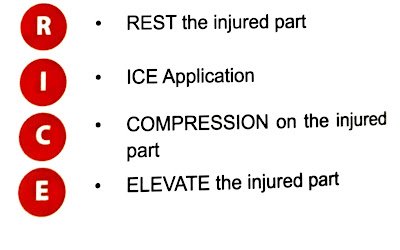
RICE: Rest, Ice, Compression, Elevation
PPC: Personal Protective Clothing
PPE: Personal Protective Equipment
The Goal of Basic First Aid Training
The goal of basic first aid training is to prepare you and your coworkers if something unexpected occurs at work. Remember that first aid is not medical treatment, but rather the fundamental first aid knowledge required to assist someone who has been injured on the job until a medical professional can provide care.
1. Recognize the Primary Goals of First Aid
As previously stated, first aid is not considered medical treatment. Instead, it is the fundamental knowledge required to assist someone who has sustained an injury until medical personnel arrive on the scene. With that in mind, the three primary goals of first aid are as follows:
Preservation of life
Provide immediate and effective first aid to save someone’s life by maintaining the airway, breathing, and circulation, and be prepared to perform life-saving emergency procedures.
Prevention of further injuries
First aid measures must be carried out in such a way that additional injuries are not caused by improper handling or incorrect technique. Only administer first aid per your training.
Encouraging recovery
This includes making every effort to ensure the victim’s physical well-being. As a form of psychological support, this also entails reassuring the victim.
If an injury occurs at work, it is your responsibility to do everything possible to keep the injured person safe and alive so that they can recover quickly after being treated by medical professionals.
2. Always assess the situation first.
If you come across a worker who has been injured on the job, it’s critical to assess the situation using the DRABCD method before rushing in to provide first aid. This is the first and most important step in providing basic first aid. Here are a few reminders about what you should do to assess the situation:
Examine the surroundings for potential hazards.
Is there any danger near the injured person? You may enter the scene to provide first aid if the situation is safe. If the scene is dangerous, it is critical to assess and eliminate the danger before entering the scene. Contact emergency services immediately if the scene is unsafe.
Look for the source of the injury.
If it is safe to approach the injured person, try to determine the source of the injury. The more you know about how the person was or may have been injured, the more you can assist medical personnel.
Avoid moving the injured person.
Before emergency services arrive, you must not move the injured person. Internal injuries can be difficult to assess, so it’s always best to leave it to the professionals to decide how to move the injured person.
Call emergency services.
Once you’ve determined that the area is safe and you’ve arrived at the injured person, always dial 998 (In Dubai). If a bystander calls emergency services, make sure they are fully informed so that the appropriate assistance is dispatched to the scene. Unless the operator specifically instructs you to hang up, stay on the line.
Provide basic first aid.
If the scene is safe, you are trained and capable of providing basic first aid, and you should do so now. Wait with the person until emergency services arrive if you are unsure what is wrong with them. Keep the injured person calm by assuring them that they are not alone and that help is on the way.
3. Remember the Law of the Good Samaritan.
If you come across someone who has been injured in your workplace, or even outside of it, you must assist them whenever possible. The Good Samaritan Act protects those who provide reasonable assistance to those who have been injured, are in danger or are otherwise incapacitated.
The Good Samaritan law protects you if you use basic first aid to try to help someone who has been injured. The law was enacted to protect you from negative consequences if you sustain a serious injury, keeping in mind that you are aware of the DRABCD method.
4. Understand the Most Common Workplace Medical Conditions
When it comes to first aid in the workplace, it’s always a good idea to be aware of the most common medical conditions to which you may be called. If you’re familiar with these conditions, you’ll be able to provide appropriate first aid care, assisting that individual until medical professionals arrive. The following are the most common workplace medical conditions:
Respiratory distress: asthma attacks, allergic reactions, and choking are some of the most common problems you may face.
Heart attacks
Stroke
Shock
Seizures
If you’re learning about basic first aid in the workplace, it’s good to find training that can help you identify these specific medical conditions. The more prepared you are, the easier it will be to recognize the warning signs of these medical conditions. When you recognize those warning signs quickly, you can call for help and administer proper first aid care.
5. Always keep yourself safe.
One of the most important things to remember when it comes to first aid is to always protect yourself. To provide helpful, effective first aid care, you must first ensure that you are not in any danger. Here are a few precautions you should take before administering first aid in the workplace to ensure your safety.
Wear personal protective equipment.
To protect yourself from exposure, you should wear PPE or personal protective equipment. Latex gloves, disposable masks, gowns, face shields, and even goggles are examples of PPE.
If you notice the situation is dangerous, do not enter. When you assess the scene before providing first aid, you may notice that it is dangerous. You must not enter the scene in that case. If there is a danger, it is best to call 998 and keep yourself safe so that you do not become injured as well.
Allow someone with more medical training to take over if they arrive on the scene. You may be able to assist by calling 998, retrieving the first aid kit, escorting emergency personnel to the scene, or assisting in keeping the area clear.
Emergency advice DRABCD
Emergency advice DRABCD
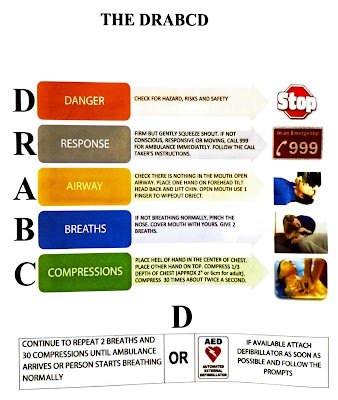
The acronym DRABCD stands for Danger, Response, Airway, Breathing, Circulation/CPR, and Defibrillation, which is an action plan in an emergency assessment of an occurrence. It’s a topic that can save lives, so everyone should have a basic understanding of it.
• Check for Danger.
The first Alphabet of DRABCD refers to Danger. Always check to see if there are any threats, risks, or dangers at the incident scene. You run the risk of getting shocked if you touch the electrocuted individual; therefore, try to turn off the electricity or use non-conducting materials to keep them away from cables and power sources. Similarly, if you see someone drowning, resist the urge to go into the water. To assess if you can handle the issue, be aware of your swimming and rescue skills. If not, yell for assistance and drag the person out of harm’s way using rope or sticks.
In the event of a fire, it is never recommended to fight the fire if it is not safe; instead, escape the premises, close the door behind you, and wait for firefighters who are trained in this field. Never put yourself in danger.
• Check for a Response.
When there is no longer a threat to the area, it is time to determine whether or not the person can respond. You must do this by approaching the person from the front. If they are conscious, it will make it easier for them to communicate with you. They could not turn towards you if you called them from behind due to injuries. If the person doesn’t answer the first time, you can tap them on the shoulder and give a loud, clear call. The following ABCD steps should be followed if the casualty doesn’t respond.
• Open Airway.
Alphabet A on DRABCD refers Airway, it’s time to check the airway if the patient is unresponsive during the aforementioned processes. To do this, you must lift the victim’s chin and tilt the casualty’s head as in the illustration. Put two fingers on the victim’s chin while keeping one hand on the forehead. If you discover something trapped in your throat, you must employ the choking prevention techniques that we have covered in this session.
• Check Breathing.
The next step is to examine their breathing. You can check to see if the casualty is breathing by looking, listening, or feeling. You may see the action of the chest rising and falling, for example. You might also listen for sounds coming from the casualty’s mouth or nose. You can even feel the breath by placing the rear of your palm near the casualty’s lips and nose. If no respiratory symptoms are detected, call the emergency services immediately and follow their instructions.
• Check Circulation and Compression / CPR
The above step determines whether or not the casualty is breathing. If there are no signs of respiration, begin Cardiopulmonary Resuscitation (CPR) [Cardio means Heart, Pulmonary means Lungs, Resuscitation means Revive] by compressing the chest with your hands 30 times followed by two rescue breaths. To keep hygiene standards up to par, use the Resuscitation Face Shield that you may find in the first aid kit box.
To perform CPR, place one hand’s heel in the center of the patient’s chest and interlock the fingers of the next hand, which should be facing the same way. Keep your arms vertical and straight above the victim’s chest. Do not pause between CPR sessions. Up until the person begins breathing on their own or until trained medical personnel arrive on the scene, keep performing CPR.
• Use Automated External Defibrillation (AED)
An automated external defibrillator (AED) is a medical device used to shock ventricular fibrillation patients back to a normal heartbeat. It was created to help people who are unconscious get back to consciousness. One AED pad must be attached to the right side of the chest, and the second pad must be attached to the left side of the chest.
Avoid contacting the casualty’s body, as the gadget may not function properly. AEDs do not work in moving automobiles, and they should not be used if the casualty is wet or resting on an electrically conductive surface.
DRABCD is a frequently asked question for the SIRA exam.
Before contacting Emergency Services, keep the following points in mind. (LIONE)
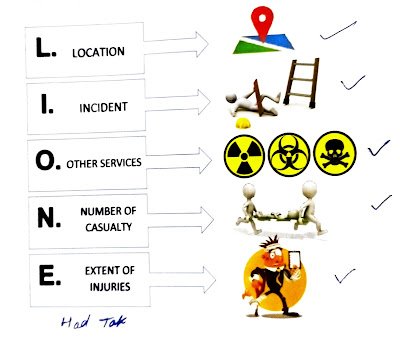
• Location
Proper information about the location of the incident allows emergency services to arrive at the scene as quickly as possible. It contributes to the injured person’s survival.
• Incident
Informing the emergency operator about the nature of the incident allows them to guide the first aider on how to handle the situation until they arrive.
• Other Services
If you could not extinguish the uncontrollable fire, call 997; if there are injuries, call 998. However, if two or more emergency services are required, dial 999 (Police) and request backup from the police, ambulance, and fire department at the same time because calling every emergency services cost a lot of time.
• Number of fatalities
In Dubai, an ambulance can only transport one injured person at a time. As a result, the number of casualties must be mentioned when reported to emergency services.
• Extent of the injuries
Because an injured person may cause more problems until the arrival of the ambulance, the extent of their injuries must be shared with operators.
Here is a list of the most common injuries that require first aid and what you can do if such an accident occurs.
• Cut or Scratches
• Choking
• Fractures
• Burn
• Insect Bite or sting
• Splinter
• Sunburn
• Nosebleed
• Sprains, Strains, and Tears
Make sure that before starting any first aid, you follow the DRABCD procedure as applicable
• Cut or Scratches
Minor wounds like cuts and scratches typically heal on their own. If necessary, elevate the incision and gently apply pressure with a clean bandage or towel until the bleeding stops. Use a clean cloth or piece of gauze to gently apply firm, direct pressure to halt the bleeding. Maintain steady pressure at all times.
To prevent the wound from bleeding again, don’t lift the gauze or cloth to check on the wound. Simply add extra dressing on top and keep applying pressure if blood leaks through the dressing.
Raising the cut above your head will aid in reducing bleeding if it is on your hand or arm.
Seek immediate medical attention if the cut spouts blood or if it doesn’t stop bleeding.
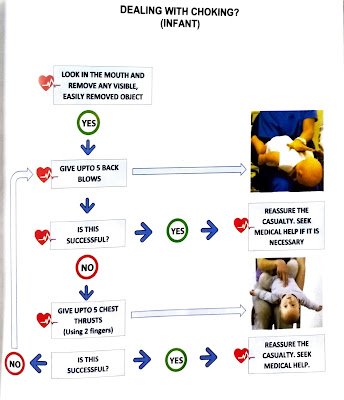
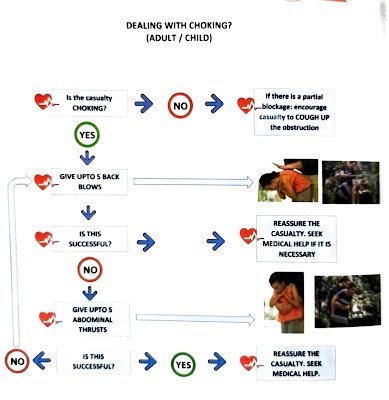
• Choking
The blockage of the airway with a foreign object in the throat or windpipe is called choking. It can happen to any age category and it’s life-threatening as the supply of oxygen to the brain is stopped partially or completely. The person who is choking can be identified as they grab their throat with difficulty in speaking and breathing.
In infants, check the mouth and remove the object if it is visible and possible too and give five back blows and 5 chest thrusts using two fingers as shown in the diagram and seek medical help if necessary.
In the case of adults, encourage them to cough. If not removed, give five back blows and five abdominal thrusts as shown in the diagram and seek medical help if necessary.
• Fractures
Stop the bleeding by wrapping the wound with a sterile bandage or a clean cloth, especially if the skin is torn from an open fracture. Avoid moving the affected area; any movement can lead to serious complications, particularly with neck and back fractures.
Apply an ice pack or ice cubes wrapped in a clean cloth to the affected area to cool it down.
Treat the patient’s shock by assisting them in getting into a comfortable position, encouraging them to rest, and assuring them. To keep them warm, wrap them in a blanket or clothing.
Call an ambulance and assist the patient in getting to the emergency room for examination and treatment.
• Burn
Reduce the burn’s heat by applying cool, wet compresses after holding the burn under cool, running water until the discomfort goes away.
Remove any tight objects from the burned area, such as rings. Be careful, but act swiftly to avoid swelling.
Do not pop blisters. Fluid-filled blisters keep the region from getting infected. Cleanse the area and use a gentle antibiotic ointment if a blister breaks.
Use a moisturizing lotion, such as an aloe vera-based one. Apply a lotion to the burned area once it has cooled to provide comfort and prevent drying out.
Bandage the burn loosely. The Gauze should be sterile. Stay away from fluffy cotton that could shed and adhere to the healing region.
Additionally, try not to apply too much pressure on the burned skin. If required, take an over-the-counter painkiller.
• Insect Bite or Sting
First of all check for D of DRABCD, if there is any danger of insects or snakes that may attack you. After confirming, keep the patient still to reduce the venom’s toxicity. To remove any remaining venom from the skin, thoroughly wash the bitten area. Apply a wrapped ice pack or a cold compress soaked in water and containing a few ice cubes for up to 10 minutes at a time. An ice pack should be wrapped in a moist cloth to maximize its benefits and prevent skin burns. When a cold compress becomes heated, it must be replaced. If the bite is on the hand, use an elevating sling to provide comfort and support.
If the pain worsens or the patient becomes ill with a fever, headache, nausea, or vomiting, call an ambulance.
• Splinter
The hands and the area around the splinter should be washed with soap and warm water. Put the ends of tweezers and a needle in boiling water to sterilize them, then wipe them clean with a clean cotton ball or alcohol pad. If the splinter is stuck through the skin, use tweezers to firmly grasp the end. Pull slowly and gently at the same angle the splinter entered to avoid breaking it.
If the splinter’s tip isn’t sticking out, use the needle to gently scrape the skin away from the splinter until there’s an end to grab with the tweezers. After removing the splinter, wash the affected area and bandage it.
If the splinter appears to be too deep or refuses to come out, is under a fingernail or toe and cannot be reached, the wound is bleeding profusely, or the skin around the wound appears infected, seek medical attention.
To avoid splinters, avoid rubbing your hands on wooden surfaces, wear slippers or shoes after glass breaks on the floor, and stay away from bushes and plants with thorns or spikes.
• Sunburn
Sunburn is caused by prolonged exposure to UV rays. Here are some sunburn remedies.
Cool the skin by using cool showers or baths regularly to help relieve pain
To soothe and moisturize the skin, apply after sun or aloe vera gel.
To avoid dehydration, drink plenty of water.
To relieve discomfort and swelling, take over-the-counter pain relievers such as paracetamol or ibuprofen.
The Skin should not be picked or peeled. Your skin may peel naturally, but do not pick at it or break blisters. Cleanly broken blisters with soap and antibiotic ointment.
Wear loose-fitting clothing to avoid rubbing.
Wear clothing that covers your skin when you go outside to protect yourself from further sun exposure, and continue to use sunscreen.
• Nosebleed
Reassure the individual, particularly children, because crying increases blood flow.
Straighten the person’s back and tilt their head slightly forward.
For at least 10 minutes, apply finger and thumb pressure to the soft part of the nostrils below the bridge of the nose.
While the person’s nostrils are pinched, encourage them to breathe through their mouth.
Loosen any clothing that is too tight around the neck.
Wrap a cold cloth or cold pack around the person’s head and neck, paying special attention to the sides of the neck.
Release the pressure on the nostrils after 10 minutes and check to see if the bleeding has stopped.
Seek medical attention if the bleeding continues.
For at least 15 minutes, tell the person not to sniff or blow their nose.
Tell the individual not to sniff or blow their nose for at least 15 minutes, and not to pick their nose for the remainder of the day. (Having a nose full of clotted blood is unpleasant, and children, in particular, may find it difficult to refrain from sniffing or blowing their nose for several hours. At the very least, fifteen minutes will allow the clot to settle.)
If the bleeding does not stop after simple first-aid measures, you should visit a doctor or a hospital emergency department. It is critical to identify and treat the source of persistent bleeding.
• Sprains, Strains, and Tears
The RICE method is highly recommended for the at-home treatment of sprains and strains. It’s inexpensive and simple; all you need is something cold and a barrier between it and your skin. RICE stands for Rest, Ice, Compression, and Elevation and is recommended for the first 2-3 days after an injury.
Rest
Avoid exercising and other physical activities that may aggravate the injury.
Ice
Apply ice to the injury for up to 20 minutes every 2-3 hours, using an appropriate barrier.
Compression
Use a bandage, compression cuff, or joint support to apply compression.
Elevation
Keep it as high as possible.
After reading this article, hopefully, you have a better understanding of AEDs, CPR, DRABCD, and other first aid safety-related issues.